
การที่ Intel AppUp นั้นรองรับทั้ง Windows และ MeeGo
สร้างคำถามว่านักพัฒนาควรพัฒนาด้วยเครื่องมือชุดใด
จึงจะสามารถพัฒนาแอพลิเคชั่นสำหรับทุกที่ได้ ก่อนหน้านี้ใน Moblin
นั้นประเด็นนี้ยังขาดความชัดเจนพอสมควร แต่พลังจากร่วมมือกับโนเกียจนได้
MeeGo ออกมาความร่วมมือนี้ก็ทำให้ MeeGo ได้รับ Qt
ซึ่งสามารถใช้พัฒนาซอฟต์แวร์ทั้งบนเดสก์ทอปและ MeeGo ได้พร้อมกัน
แม้จะพัฒนาด้วยเฟรมเวิร์คตัวเดียวกันได้ แต่การพัฒนาแอพลิเคชั่น Qt สำหรับอุปกรณ์ที่หลากหลายนั้นก็ไม่ใช่เรื่องที่ทำได้อย่างสำเร็จรูป เนื่องจากหน้าจอที่แตกต่างกันบนแต่ละแพลตฟอร์ม ใน Qt 4.7 เป็นต้นมาทางโนเกียจึงพัฒนาส่วนภาษา QML ที่เป็นเหมือน HTML ที่ทำหน้าที่หน้าจอให้กับบริการเว็บ แต่ QML นั้นจะเป็นส่วนแสดงผลให้กับ Qt ด้านล่าง
ในบทความนี้เราจะแนะนำการพัฒนาแอพลิเคชั่นด้วย Qt และ QML อย่างง่ายๆ
บางคนอาจจะเริ่มอยากปิดบทความนี้แล้วหลังจากเห็นคำว่า C++ เข้าไป แต่เดี๋ยวก่อน ถ้าคุณอ่านต่อไปภายใน 10 นาทีนี้ คุณอาจจะสนใจมันมากกว่าเดิม เพราะปัจจุบันมี QML ซึ่งจะทำให้เราสร้างแอพลิเคชันโดยไม่ต้องเขียน C++ ได้ด้วย
สำหรับการทำงานของโปรแกรมส่วนที่เขียนด้วย QML นั้น จะทำงานอยู่บน QML Viewer อีกทีหนึ่ง ลักษณะเดียวกับที่โปรแกรมภาษา ActionScript ทำงานอยู่บน Flash Player แต่ QML Viewer นั้นจะเป็นส่วนหนึ่งของแอพลิเคชันของเราด้วย ซึ่งทำให้ผู้ใช้ไม่ต้องติดตั้ง QML Viewer เอง
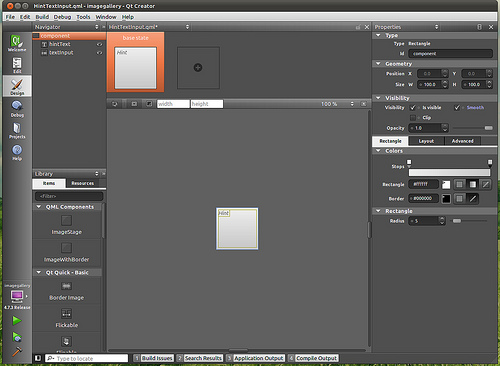
นอกจากรูปแบบภาษาที่ง่ายและคุ้นเคยสำหรับดีไซน์เนอร์แล้ว บน Qt Creator 2.2 ขึ้นไปจะสามารถใช้ Qt Designer เพื่อลากวาง จัดการหน้าต่างโปรแกรมที่เขียนด้วย QML ได้แล้ว
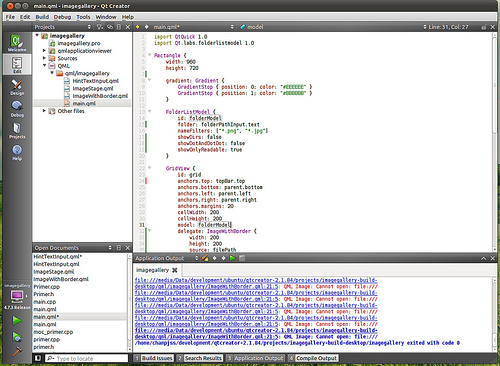
ในส่วนของ Editor นั้นทำงานได้ดี ตอบสนองรวดเร็ว และแบ่งส่วนการทำงานต่างๆ ได้ชัดเจน เข้าใจง่าย ใครที่เคยใช้ Visual Studio หรือว่า Eclipse มาแล้วน่าจะรู้สึกดีกับ Editor ของ QtCreator ไม่น้อย
ในบทความนี้จะไม่ลงรายละเอียดเกี่ยวกับ QtCreator มากกว่านี้นะครับ ทดลองดาวน์โหลดมาเล่นกันเองได้เลย ในส่วนต่อไปจะเน้นไปที่ความสามารถของ QML โดยยกตัวอย่างคู่กับซอร์สโค้ดเป็นหลัก (ถึงแม้ว่าบางส่วนจะสร้างได้จาก IDE โดยไม่ต้องเขียนโค้ดเองก็ตาม)
ฟังดูเหมือนจะยุ่งยาก
แต่แนวคิดนี้จะทำให้ผู้ออกแบบส่วนติดต่อผู้ใช้สามารถสร้างคอมโพเนนต์ใหม่ที่
มีพฤติกรรมแตกต่างไปจากคอมโพเนนต์มาตรฐานในแอพลิเคชันอื่นได้ง่าย
โดยเอาคอมโพเนนต์พื้นฐานมาประกอบกันได้เลย โดยไม่ต้องสร้างคอมโพเนนต์ใหม่
ซึ่งต้องเข้าใจแนวคิดแบบ OOP และกระบวนการวาดคอมโพเนนต์อันยุ่งยาก
(มีตัวอย่างท้ายบทความนี้)
นอกจากนี้ คอมโพเนนต์ที่ทำหน้าที่อย่างเดียวนี้ หลายๆ ตัวก็ฉลาดพอที่จะทำให้เราเขียนโปรแกรมได้ง่ายขึ้น เช่น การใส่รูปภาพในแอพลิเคชัน สามารถทำได้ดังนี้
สังเกตว่าสามารถโหลดรูปจากอินเทอร์เน็ตได้ โดยไม่ต้องเขียนโค้ดใดๆ เลย
สำหรับคอมโพเนนต์ และอีลิเมนต์ทั้งหมดที่มีให้ใช้ สามารถดูเพิ่มได้จากเอกสารของ Qt
อีกแนวคิดหนึ่งที่สำคัญและต้องใช้บ่อยในการจัดเลย์เอาต์คือ anchor-based
layout ซึ่งเราสามารถจัดตำแหน่งเลย์เอาต์แบบสัมพัทธ์กับคอนเทนเนอร์
หรือตำแหน่งของคอมโพเนนต์อื่นๆ ในคอนเทนเนอร์เดียวกันได้
โดยเปรียบเทียบตำแหน่งของเส้นต่างๆ ที่อ้างอิงได้บนคอมโพเนนต์ (top,
bottom, left, right, orizontalCenter, verticalCenter, baseline)
หรือกำหนดขนาดเปรียบเทียบกับคอนเทนเนอร์ได้
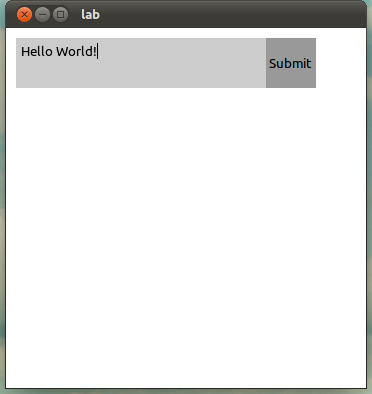
เช่น หากต้องการสร้างกล่องข้อความที่มีปุ่มด้านหลัง เราสามารถกำหนดให้ปุ่มมีขอบด้านบน ขวา และล่าง ชิดติดกับกล่องข้อความได้ด้วยซอร์สโค้ดด้านล่าง (สังเกตส่วนที่นำหน้าด้วย
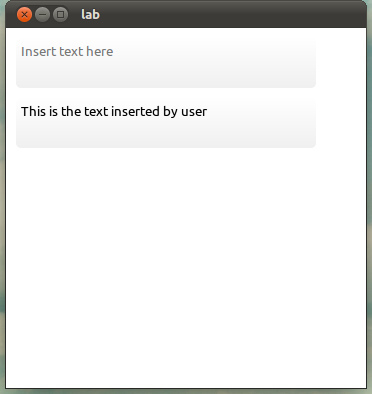
เช่น การสร้างกล่องข้อความที่มีข้อความแนะนำผู้ใช้หากยังไม่ได้กรอกข้อความ จะเขียนได้ดังนี้ (โค้ดด้านล่างตัดส่วนหน้าตาและการจัดเลย์เอาต์ออกไป เพื่อให้แสดงฟีเจอร์นี้ได้ชัดเจน)
การ binding สามารถทำได้ถึงแม้ว่าจะกำหนดค่าจะกำหนดด้วยฟังก์ชันก็ตาม
หากค่าใดก็ตามที่ถูกอ้างอิงในฟังก์ชันเปลี่ยนค่าไป
ก็จะเกิดการอัพเดตใหม่เช่นเดียวกัน เช่น
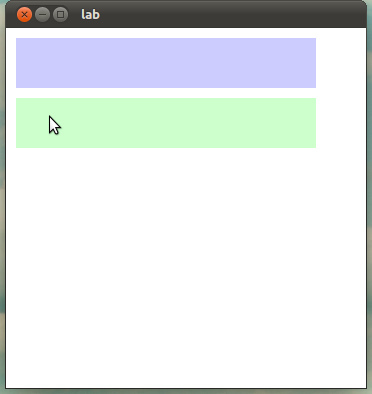
เราสามารถสร้างปุ่มให้มีสีแตกต่างไปเมื่อลากเมาส์ผ่านและกดได้ดังนี้
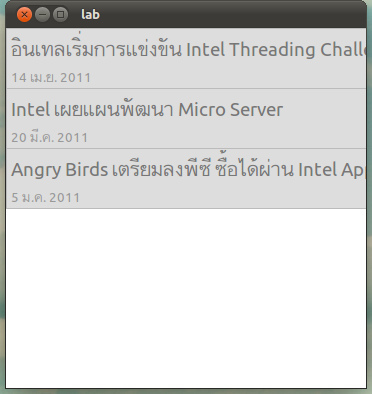
ตัวอย่างลิสต์ข่าวใน Blognone เป็นดังซอร์สโค้ดด้านล่าง
ตัวอย่างเช่น โปรแกรมด้านล่างนี้ ปุ่มจะเลื่อนลงไปด้านล่างเมื่อถูกคลิก และ log ตำแหน่งปุ่มใหม่
นอกจากนี้ เพื่อความสะดวกในการจัดการคุณสมบัติต่างๆ เราสามารถกำหนด
state ของคอมโพเนนต์ เพื่อสั่งเปลี่ยนคุณสมบัติต่างๆ พร้อมกันเป็นชุดๆ
พร้อมกับทำอนิเมชันระหว่างการเปลี่ยนแต่ละ state ได้
เช่น จากตัวอย่างก่อนหน้านี้สามารถเขียนได้โดยกำหนด State สำหรับกรณีปกติ (normal) กรณีเมาส์วางเหนือปุ่ม (hovered) และกรณีถูกคลิก (clicked) โดยสามารถกำหนดคุณสมบัติที่จะเปลี่ยนแปลงไปในแต่ละ State โดยใส่อีลิเมนต์ PropertyChanges ลงใน State นั้นๆ จากนั้นจึงกำหนดอนิเมชันการเปลี่ยนแปลง State ในคุณสมบัติ transitions
สำหรับการสร้างอนิเมชันให้คอมโพเนนต์ด้วยวิธีอื่นๆ อ่านได้จากเอกสารของ Qt
บทความนี้ได้รับการสนับสนุนจากบริษัทอินเทล ไมโครอิเล็กทรอนิกส์ (ประเทศไทย) จำกัด เพื่อสนับสนุนให้นักพัฒนาสามารถเข้าร่วมกับ Intel AppUp Center ได้ง่ายยิ่งขึ้น ท่านสามารถเข้าดูข้อมูลเพิ่มเติมของ Intel AppUp ได้ที่ Intel AppUp Developer Program
แม้จะพัฒนาด้วยเฟรมเวิร์คตัวเดียวกันได้ แต่การพัฒนาแอพลิเคชั่น Qt สำหรับอุปกรณ์ที่หลากหลายนั้นก็ไม่ใช่เรื่องที่ทำได้อย่างสำเร็จรูป เนื่องจากหน้าจอที่แตกต่างกันบนแต่ละแพลตฟอร์ม ใน Qt 4.7 เป็นต้นมาทางโนเกียจึงพัฒนาส่วนภาษา QML ที่เป็นเหมือน HTML ที่ทำหน้าที่หน้าจอให้กับบริการเว็บ แต่ QML นั้นจะเป็นส่วนแสดงผลให้กับ Qt ด้านล่าง
ในบทความนี้เราจะแนะนำการพัฒนาแอพลิเคชั่นด้วย Qt และ QML อย่างง่ายๆ
Qt
Qt เป็นเฟรมเวิร์กสำหรับสร้างแอพลิเคชัน และส่วนติดต่อผู้ใช้ที่ cross-platform โดยเขียนเพียงครั้งเดียว แต่สามารถ deploy ไปใช้บนระบบปฏิบัติการ และเครื่องมือต่างๆ ได้มากมาย เช่น บนคอมพิวเตอร์ที่ใช้ระบบปฏิบัติการ Windows, Mac, Linux, โทรศัพท์มือถือที่ใช้ Symbian หรือแท็บเล็ต MeeGo ของ Intent โดยตัว Qt นั้นเป็นเฟรมเวิร์กสำหรับแอพลิเคชันที่พัฒนาด้วยภาษา C++ เป็นหลักบางคนอาจจะเริ่มอยากปิดบทความนี้แล้วหลังจากเห็นคำว่า C++ เข้าไป แต่เดี๋ยวก่อน ถ้าคุณอ่านต่อไปภายใน 10 นาทีนี้ คุณอาจจะสนใจมันมากกว่าเดิม เพราะปัจจุบันมี QML ซึ่งจะทำให้เราสร้างแอพลิเคชันโดยไม่ต้องเขียน C++ ได้ด้วย
QML และ Qt Quick
ภาษา QML (Qt Meta-Object Language) มีลักษณะของ CSS และภาษา JavaScript ปนกัน (บางทีก็รู้สึกว่าเหมือน JSON เข้าไปด้วย) โดยเราจะระบุชื่อคอมโพเนนต์ และระบุคุณสมบัติต่างๆ ของคอมโพเนนต์นั้นในเครื่องหมายปีกกา รวมถึงสามารถระบุการทำงานด้วยภาษา JavaScript ไว้ได้ ซึ่งเราสามารถใช้เพียง QML นี้ในการเขียนเกือบทั้งแอพลิเคชันได้ โดยไม่จำเป็นต้องแตะภาษา C++ เลย ปัจจุบัน Qt เรียกการสร้างแอพลิเคชันด้วย QML ลักษณะนี้ว่า Qt Quick เพื่อให้รู้สึกใช้ง่ายมากยิ่งขึ้นสำหรับการทำงานของโปรแกรมส่วนที่เขียนด้วย QML นั้น จะทำงานอยู่บน QML Viewer อีกทีหนึ่ง ลักษณะเดียวกับที่โปรแกรมภาษา ActionScript ทำงานอยู่บน Flash Player แต่ QML Viewer นั้นจะเป็นส่วนหนึ่งของแอพลิเคชันของเราด้วย ซึ่งทำให้ผู้ใช้ไม่ต้องติดตั้ง QML Viewer เอง
นอกจากรูปแบบภาษาที่ง่ายและคุ้นเคยสำหรับดีไซน์เนอร์แล้ว บน Qt Creator 2.2 ขึ้นไปจะสามารถใช้ Qt Designer เพื่อลากวาง จัดการหน้าต่างโปรแกรมที่เขียนด้วย QML ได้แล้ว
ในส่วนของ Editor นั้นทำงานได้ดี ตอบสนองรวดเร็ว และแบ่งส่วนการทำงานต่างๆ ได้ชัดเจน เข้าใจง่าย ใครที่เคยใช้ Visual Studio หรือว่า Eclipse มาแล้วน่าจะรู้สึกดีกับ Editor ของ QtCreator ไม่น้อย
ในบทความนี้จะไม่ลงรายละเอียดเกี่ยวกับ QtCreator มากกว่านี้นะครับ ทดลองดาวน์โหลดมาเล่นกันเองได้เลย ในส่วนต่อไปจะเน้นไปที่ความสามารถของ QML โดยยกตัวอย่างคู่กับซอร์สโค้ดเป็นหลัก (ถึงแม้ว่าบางส่วนจะสร้างได้จาก IDE โดยไม่ต้องเขียนโค้ดเองก็ตาม)
การสร้างแอพลิเคชันด้วย QML โดยใช้ QtCreator
การสร้างแอพลิเคชันด้วย QML โดยใช้ QtCreator นั้นทำได้ง่ายๆ โดยสร้างโปรเจกต์ใหม่เป็นโปรเจกต์แบบ Qt Quick Application จะได้โปรเจกต์ที่มีซอร์สโค้ด C++ ที่จำเป็นต่อการเริ่มโปรเจกต์ที่สร้างด้วย QML (ไม่ต้องแก้ไขอะไรก็ได้) และไฟล์ QML ไฟล์แรกให้เริ่มแก้ไขได้ทันทีลักษณะของคอมโพเนนต์ใน QML
คอมโพเนนต์ที่มีให้ใช้ใน QML นั้นจะใช้แนวคิดว่า คอมโพเนนต์ชิ้นหนึ่งจะมีหน้าที่หลักเพียงอย่างเดียว หากต้องการคอมโพเนนต์ที่ซับซ้อนขึ้น เราจะต้องนำคอมโพเนนต์มาประกอบกันเอง เช่น ไม่มีคอมโพเนนต์ประเภท Button ให้ใช้ แต่มีคอมโพเนนต์ประเภท MouseArea ซึ่งระบุพื้นที่ที่ตรวจจับการคลิกหรือลากผ่านได้โดยไม่มีหน้าตาให้เห็น ต้องนำไปใช้ประกอบกับคอมโพเนนต์ Rectangle และ Text เพื่อให้ออกมาเป็นปุ่มที่สมบูรณ์
1
2
3
4
5
6
7
8
9
10
11
12
13
14
15
16
| Rectangle { id: buttonBg width: 300 height: 50 color: "#999999" MouseArea { id: buttonArea hoverEnabled: true anchors.fill: parent } Text { id: buttonLabel text: "Click me" anchors.centerIn: parent }} |
นอกจากนี้ คอมโพเนนต์ที่ทำหน้าที่อย่างเดียวนี้ หลายๆ ตัวก็ฉลาดพอที่จะทำให้เราเขียนโปรแกรมได้ง่ายขึ้น เช่น การใส่รูปภาพในแอพลิเคชัน สามารถทำได้ดังนี้
1
2
3
4
| Image { fillMode: "PreserveAspectFit"} |
สำหรับคอมโพเนนต์ และอีลิเมนต์ทั้งหมดที่มีให้ใช้ สามารถดูเพิ่มได้จากเอกสารของ Qt
การจัดเลย์เอาต์
นอกจากการจัดตำแหน่งคอมโพเนนต์โดยกำหนดพิกัด x, y แล้ว หากมีคอมโพเนนต์จำนวนมาก สามารถใช้ Positioner ช่วยในการจัดเลย์เอาต์เป็นแถว คอลัมน์ หรือกริดได้ด้วยคอมโพเนนต์ Row, Column, Grid เช่น
1
2
3
4
5
6
7
8
9
10
11
12
| Column { Text { text: "First line text" font.pointSize: 14 color: "#777777" } Text { text: "Second line text" font.pointSize: 10 color: "#999999" }} |
เช่น หากต้องการสร้างกล่องข้อความที่มีปุ่มด้านหลัง เราสามารถกำหนดให้ปุ่มมีขอบด้านบน ขวา และล่าง ชิดติดกับกล่องข้อความได้ด้วยซอร์สโค้ดด้านล่าง (สังเกตส่วนที่นำหน้าด้วย
anchors.*)
1
2
3
4
5
6
7
8
9
10
11
12
13
14
15
16
17
18
19
20
21
22
23
24
25
26
27
28
29
| Rectangle { width: 360 height: 360 Rectangle { id: textField color: "#CCCCCC" width: 300 height: 50 TextEdit { anchors.fill: parent anchors.margins: 5 }}<p></p><p>Rectangle { width: 50 anchors.top: textField.top anchors.bottom: textField.bottom anchors.right: textField.right anchors.topMargin: 0 anchors.bottomMargin: 0 anchors.rightMargin: 0 color: "#999999" Text { text: "Submit" anchors.centerIn: parent }}</p> |
การทำงานกับค่าต่างๆ ด้วยระบบ binding
ระบบ binding คือการกำหนดค่าโดยอ้างอิงจากค่าอื่น ซึ่งจะอัพเดตอัตโนมัติเมื่อค่าที่อ้างอิงนั้นเปลี่ยนค่าไป ซึ่งพบได้ในภาษาที่เน้นการสร้างส่วนติดต่อผู้ใช้ให้ง่ายๆ อยู่แล้ว แต่ใน QML นั้นพิเศษยิ่งขึ้น โดยการกำหนดค่าทั้งหมดที่ไม่ได้ระบุค่าโดยตรง แต่อ้างถึงคอมโพเนนต์ใดๆ จะทำการ binding ให้โดยอัตโนมัติทันทีเช่น การสร้างกล่องข้อความที่มีข้อความแนะนำผู้ใช้หากยังไม่ได้กรอกข้อความ จะเขียนได้ดังนี้ (โค้ดด้านล่างตัดส่วนหน้าตาและการจัดเลย์เอาต์ออกไป เพื่อให้แสดงฟีเจอร์นี้ได้ชัดเจน)
1
2
3
4
5
6
7
| Text { text: "Enter your name" visible: textEditField.text.length > 0}TextEdit { id: textEditfield} |
1
2
3
4
5
6
7
8
9
10
11
12
13
14
15
16
17
18
| Rectangle { id: buttonBg width: 50 height: 50 color: { if (buttonArea.pressed) return "#FFCCCC"; else if (buttonArea.containsMouse) return "#CCFFCC"; else return "#CCCCFF"; } MouseArea { id: buttonArea hoverEnabled: true anchors.fill: parent }} |
การทำงานกับลิสต์
การแสดงข้อมูลที่เป็นรายการ ทำได้โดยใช้คอมโพเนนต์ประเภท View ซึ่งเบื้องต้นจะมี GridView, ListView และ PathView โดยเราจะต้อง- กำหนด model ซึ่งเป็นข้อมูลที่จะแสดงในลิสต์ ซึ่งเป็นอีลิเมนต์ ListModel ที่บรรจุสมาชิกประเภท ListElement (หากเชี่ยวชาญแล้ว สามารถสร้าง ListModel และ ListElement ประเภทอื่นๆ จากซอร์สโค้ดภาษา C++ ได้ด้วย)
- กำหนด delegate ซึ่งเป็นคอมโพเนนต์ที่จะใช้แสดงแต่ละชิ้นของลิสต์
- อาจกำหนด highlight ซึ่งเป็นคอมโพเนนต์ที่จะแสดงด้านหลัก delegate ที่กำลังเลือกอยู่ได้ด้วย
ตัวอย่างลิสต์ข่าวใน Blognone เป็นดังซอร์สโค้ดด้านล่าง
1
2
3
4
5
6
7
8
9
10
11
12
13
14
15
16
17
18
19
20
21
22
23
24
25
26
27
28
29
30
31
32
33
34
35
36
37
38
39
40
41
42
43
44
45
46
47
48
49
50
51
| ListModel { id: newsModel ListElement { title: "อินเทลเริ่มการแข่งขัน Intel Threading Challenge 2011" time: "14 เม.ย. 2011" } ListElement { title: "Intel เผยแผนพัฒนา Micro Server" time: "20 มี.ค. 2011" } ListElement { title: "Angry Birds เตรียมลงพีซี ซื้อได้ผ่าน Intel AppUp" time: "5 ม.ค. 2011" }}<p></p><p>Component { id: newsDelete Item { anchors.left: parent.left anchors.right: parent.right height: 60 Rectangle { color: "#DDDDDD" border.color: "#BBBBBB" anchors.fill: parent } Column { anchors.fill: parent anchors.margins: 5 Text { text: title font.pointSize: 14 color: "#777777" } Text { text: time font.pointSize: 10 color: "#999999" } } }}</p><p>ListView { id: newsList anchors.fill: parent model: newsModel delegate: newsDelete}</p> |
การโต้ตอบกับผู้ใช้ด้วยแนวคิด signal/slot
นอกจากจะใช้การ binding ในการจัดการข้อมูลและการแสดงผลแล้ว เรายังสามารถรอดูเหตุการณ์ต่างๆ ที่เกิดขึ้นในลักษณะเดียวกับการดักรออีเวนต์ในภาษาอื่นๆ แต่ใน Qt และ QML จะเรียกส่วนนี้ว่า signal และ slot ซึ่งจะมีรายละเอียดปลีกย่อยแตกต่างไปเล็กน้อย แต่สำหรับผู้ที่เขียน QML แทบจะไม่รู้สึกแตกต่างอะไรกับระบบอีเวนต์เลยตัวอย่างเช่น โปรแกรมด้านล่างนี้ ปุ่มจะเลื่อนลงไปด้านล่างเมื่อถูกคลิก และ log ตำแหน่งปุ่มใหม่
1
2
3
4
5
6
7
8
9
10
11
12
13
14
15
| Rectangle { id: buttonBg width: 150 height: 50 color: "#999999" onYChanged: { console.log(buttonBg.y) } MouseArea { anchors.fill: parent onPressed: { buttonBg.y += 20 } }} |
การจัดการสถานะของคอมโพเนนต์และทำอนิเมชัน
การแสดงอนิเมชันให้กับคอมโพเนนต์ใดๆ สามารถทำได้ง่ายๆ โดยสามารถกำหนดอนิเมชันการเปลี่ยนคุณสมบัติของคอมโพเนนต์ได้ โดยใส่อีลิเมนต์ Behavior เช่น ตัวอย่างด้านล่างนี้คือการนำปุ่มเปลี่ยนสีจากตัวอย่างก่อนหน้ามาใส่อนิเมชัน เปลี่ยนสีลงไป
1
2
3
4
5
6
7
8
9
10
11
12
13
14
15
16
17
18
19
20
21
| Rectangle { id: buttonBg width: 50 height: 50 color: { if (buttonArea.pressed) return "#FFCCCC"; else if (buttonArea.containsMouse) return "#CCFFCC"; else return "#CCCCFF"; } MouseArea { id: buttonArea hoverEnabled: true anchors.fill: parent } Behavior on color { ColorAnimation { duration: 200 } }} |
เช่น จากตัวอย่างก่อนหน้านี้สามารถเขียนได้โดยกำหนด State สำหรับกรณีปกติ (normal) กรณีเมาส์วางเหนือปุ่ม (hovered) และกรณีถูกคลิก (clicked) โดยสามารถกำหนดคุณสมบัติที่จะเปลี่ยนแปลงไปในแต่ละ State โดยใส่อีลิเมนต์ PropertyChanges ลงใน State นั้นๆ จากนั้นจึงกำหนดอนิเมชันการเปลี่ยนแปลง State ในคุณสมบัติ transitions
1
2
3
4
5
6
7
8
9
10
11
12
13
14
15
16
17
18
19
20
21
22
23
24
25
26
27
28
29
30
31
32
33
34
35
36
37
38
39
40
41
42
43
44
45
46
47
48
| Rectangle { id: buttonBg width: 50 height: 50 color: "#FFCCCC" states: [ State { name: "normal" PropertyChanges { target: buttonBg color: "#FFCCCC" } }, State { name: "hovered" PropertyChanges { target: buttonBg color: "#CCFFCC" } }, State { name: "clicked" PropertyChanges { target: buttonBg color: "#CCCCFF" } } ] transitions: Transition { ColorAnimation { target: buttonBg duration: 200 } } state: { if (buttonArea.pressed) return "clicked" else if (buttonArea.containsMouse) return "hovered" else return "normal" } MouseArea { id: buttonArea hoverEnabled: true anchors.fill: parent }} |
การสร้างคอมโพเนนต์ขึ้นใช้เอง
เราสามารถสร้างคอมโพเนนต์ด้วย QML ได้โดยสร้างคอมโพเนนต์ขึ้นเป็นไฟล์ QML ใหม่หนึ่งไฟล์ ซึ่งระบุคอมโพเนนต์ลูกในคอมโพเนนต์นั้น นอกจากนี้เรายังสามารถประกาศคุณสมบัติ และ signal ใหม่ ให้กับคอมโพเนนต์ที่เราสร้างขึ้นได้ ตัวอย่างเช่น การสร้างกล่องข้อความที่มีข้อความแนะนำเมื่อผู้ใช้ยังไม่ได้พิมพ์ข้อความ จะเขียนได้ดังนี้
1
2
3
4
5
6
7
8
9
10
11
12
13
14
15
16
17
18
19
20
21
22
23
24
25
26
27
28
29
30
31
32
33
34
35
36
37
38
39
40
| // HintTextInput.qml<p></p><p>import QtQuick 1.0</p><p>Rectangle { id: component property string text: "" property string hint: ""</p><pre><code> radius: 5 smooth: true anchors.fill: parent gradient: Gradient { GradientStop { position: 0; color: "#FFFFFF" } GradientStop { position: 1; color: "#F0F0F0" } } Text { id: hintText text: component.hint color: "#777777" visible: textInput.text.length === 0 anchors.fill: parent anchors.margins: 5 } TextInput { id: textInput text: component.text anchors.fill: parent anchors.margins: 5 }Binding { target: component property: "text" value: textInput.text}</code></pre><p>}</p> |
ตัวอย่างแอพลิเคชันอย่างง่าย
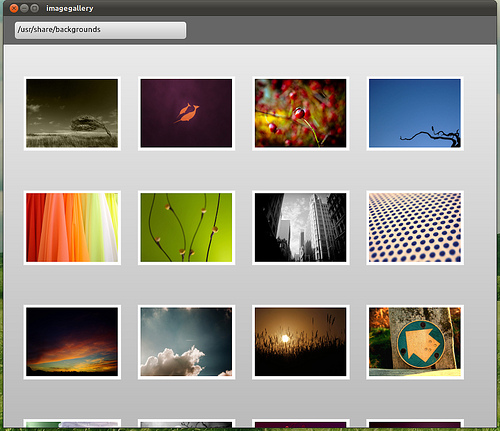
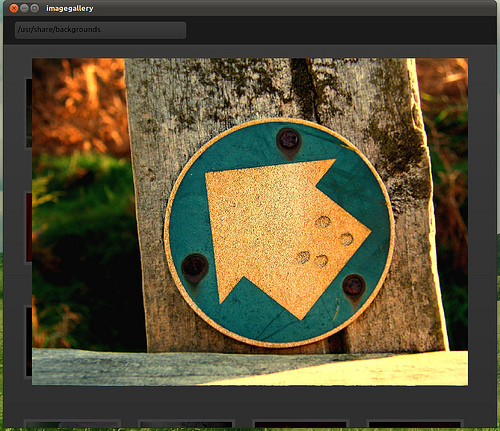
เพื่อให้เห็นภาพการสร้างแอพลิเคชันที่พอจะทำงานได้จริงๆ ตอนท้ายนี้จึงมีตัวอย่างแอพลิเคชันดูรูปภาพอย่างง่ายๆ พร้อมคอมเมนต์ประกอบ โดยผู้อ่านสามารถทดลองสร้างเองได้โดยใช้ซอร์สโค้ด ต่อไปนี้- HintTextInput.qml เป็นคอมโพเนนต์ช่องกรอกข้อความ
- ImageWithBorder.qml เป็นคอมโพเนนต์รูปเล็กหนึ่งรูป พร้อมกรอบสีขาว
- ImageStage.qml เป็นคอมโพเนนต์พื้นหลังสีดำ แสดงภาพใหญ่หนึ่งพอ
- main.qml เป็นตัวแอพลิเคชันซึ่งนำคอมโพเนนต์ทั้งสามที่สร้างขึ้นมาประกอบกัน และแสดงผลร่วมกับ GridView
บทสรุป
QML เป็นเครื่องมือสร้างส่วนติดต่อผู้ใช้ที่น่าจับตามอง ด้วยคุณสมบัติเด่นๆ หลายประการ- ถึงจะเป็นแอพลิเคชัน cross-platform ก็สวยได้
- มี IDE สนับสนุนทั้งการออกแบบแบบลากวาง และแก้ไขโค้ดอย่างครบครัน
- ไม่ต้องเขียนโปรแกรมเก่ง แค่เคยเห็น CSS กับ JavaScript ผ่านๆ ตาก็เขียนได้แล้ว
- ยืดหยุ่นต่อการสร้างคอมโพเนนต์แบบต่างๆ ได้โดยไม่ต้องเขียนโปรแกรมลงลึกในส่วนภาษา C++
- ถ้าอยากได้ขุมพลังแอพลิเคชันรันเร็วประสิทธิภาพสูง ก็สามารถเรียกฟังก์ชันที่เขียนด้วย C++ ได้
บทความนี้ได้รับการสนับสนุนจากบริษัทอินเทล ไมโครอิเล็กทรอนิกส์ (ประเทศไทย) จำกัด เพื่อสนับสนุนให้นักพัฒนาสามารถเข้าร่วมกับ Intel AppUp Center ได้ง่ายยิ่งขึ้น ท่านสามารถเข้าดูข้อมูลเพิ่มเติมของ Intel AppUp ได้ที่ Intel AppUp Developer Program


 ช่วงนี้มีเวลาทดลองและเล่นอุปกรณ์อิเล็กทรอนิกส์หลายตัว
ซึ่งจริงๆตัวเองก็จบอิเล็กทรอนิกส์มาแต่ก็ไม่ได้เล่นมาหลายปี
พอกลับมาเล่นอีกทีก็ต้องรื้อฟื้นกันเยอะหน่อย
ทุกวันนี้อุปกรณ์อิเล็กทรอนิกส์ราคาถูกมากๆ เมื่อเทียบกับ 10
ปีที่แล้วนี้คนละเรื่องเลย วันนี้เริ่มที่การ login เข้าใช้งานตัว
Raspberry-Pi กันก่อน ปกติถ้าเราจะทำการ login เข้าไปยัง Raspberry-Pi
เราจะต้องต่อจอ หรือไม่ก็ต้องทราบ IP Address เพื่อจะได้ทำการ SSH
เข้าไปได้ แต่วันนี้เราจะลองทำการ login ผ่านทางพอร์ต UART ของเจ้า
Raspberry-Pi กันดู พอร์ตของ Raspberry-Pi ที่มีให้เราใช้งานจะมีอยู่ 2
ขาที่ทำหน้าที่เป็น Tx กับ Rx คือขาที่ 8 และ 10
ช่วงนี้มีเวลาทดลองและเล่นอุปกรณ์อิเล็กทรอนิกส์หลายตัว
ซึ่งจริงๆตัวเองก็จบอิเล็กทรอนิกส์มาแต่ก็ไม่ได้เล่นมาหลายปี
พอกลับมาเล่นอีกทีก็ต้องรื้อฟื้นกันเยอะหน่อย
ทุกวันนี้อุปกรณ์อิเล็กทรอนิกส์ราคาถูกมากๆ เมื่อเทียบกับ 10
ปีที่แล้วนี้คนละเรื่องเลย วันนี้เริ่มที่การ login เข้าใช้งานตัว
Raspberry-Pi กันก่อน ปกติถ้าเราจะทำการ login เข้าไปยัง Raspberry-Pi
เราจะต้องต่อจอ หรือไม่ก็ต้องทราบ IP Address เพื่อจะได้ทำการ SSH
เข้าไปได้ แต่วันนี้เราจะลองทำการ login ผ่านทางพอร์ต UART ของเจ้า
Raspberry-Pi กันดู พอร์ตของ Raspberry-Pi ที่มีให้เราใช้งานจะมีอยู่ 2
ขาที่ทำหน้าที่เป็น Tx กับ Rx คือขาที่ 8 และ 10


