โปรโตคอล MODBUS เป็นโปรโตคอลเพื่อสื่อสารข้อมูลอินพุต/เอาต์พุตและรีจีสเตอร์ภายใน PLC ซึ่งถูกคิดค้นโดย Modicon (ปัจจุบันคือบริษัท Schneider Electric) โปรโตคอล MODBUS ได้เป็นที่ยอมรับกันอย่างกว้างขวางในการติดต่อสื่อสารที่เป็นแบบ Network Protocol อันเนื่องมาจาก MODBUS เป็นระบบเปิด, ไม่มีค่าใช้จ่าย, เชื่อมต่อและพัฒนาง่าย พร้อมทั้งยังสามารถนำโปรโตรคอลนี้ไปใช้งานในอุปกรณ์อื่นๆ เช่น Digital Power Meter, RTU (Remote Terminal Unit), Remote I/O, PLC เป็นต้น นอกจากนี้ MODBUS ยังสามารถรองรับและใช้งานร่วมกับ Application จำพวก SCADA และ HMI Software ได้อีกด้วยโปรโตคอล MODBUS เป็นการสื่อสารข้อมูลในลักษณะ Master/Slave ซึ่งเป็นการสื่อสารจากอุปกรณ์แม่ (Master) เครื่องเดียว ส่วนใหญ่มักเป็นซอฟต์แวร์คอมพิวเตอร์หรืออุปกรณ์แสดงผล HMI ไปยังอุปกรณ์ลูก (Slave) ได้หลาย ๆ เครื่อง โดยสามารถกำหนดหมายเลขอุปกรณ์ได้สูงสุด 255 เครื่อง โดยมีลักษณะการส่งข้อมูล 2 แบบ คือ ข้อมูลแบบแอสกี (ASCII) และข้อมูลแบบเลขฐานสอง (Binary) ในโปรโตคอล MODBUS ที่สื่อสารข้อมูลแบบ ASCII จะเรียก MODBUS ASCII และโปรโตคอล MODBUS ที่สื่อสารข้อมูลแบบเลขฐานสอง จะเรียก MODBUS RTU ทำให้มีความแตกต่างในการกำหนดค่าพอร์ตสื่อสาร
การรับส่งข้อมูลด้วยโปรโตคอล MODBUS สามารถเลือกได้ 2 โหมด คือ โหมด ASCII และโหมด RTU ซึ่งทั้ง 2 โหมดนี้มีความแตกต่างกันที่การกำหนดรูปแบบของชุดข้อมูลภายในเฟรม จะเลือกโหมดใดก็ได้แต่มีเงื่อนไขว่า อุปกรณ์ทุกตัวที่ต่อร่วมกันอยู่ในบัสหรือเครือข่ายเดียวกัน จะต้องตั้งให้เลือกใช้โหมดเดียวกันทั้งหมด
 การติดต่อสื่อสารแบบ Master/Slave
MODBUS RTU
เฟรมข้อมูลในโหมด RTU ประกอบด้วยข้อมูลแสดงตำแหน่งแอดเดรส 1 ไบต์, หมายเลขฟังก์ชัน 1 ไบต์, ข้อมูลที่ทำการรับส่งจำนวนมากสุดไม่เกิน 252 ไบต์ และรหัสตรวจสอบความถูกต้องของข้อมูลแบบ CRC (Cyclical Redundancy Checking) ขนาด 2 ไบต์ ค่า CRC นี้เป็นค่าที่คำนวณมาจากข้อมูลทุกไบต์ ไม่รวมบิต Start, Stop และ Parity Check โดยที่ตัว Slave ตัวที่ส่งข้อมูลออกมาจะสร้างรหัส CRC แล้วส่งตามท้ายไบต์ข้อมูลออกมา หลังจากนั้นเม่อ Master ได้รับเฟรมข้อมูลและถอดข้อมูลออกจากเฟรมแล้วจะทำการคำนวณค่า CRC ตามสูตรเดียวกับ Slave เพื่อทำการเปรียบเทียบค่า CRC ทั้ง 2 ค่าว่าตรงกันหรือไม่ หากไม่ตรงกันแสดงว่าเกิดความผิดพลาดในการรับส่งข้อมูลในโหมด RTU การรับส่งข้อมูล 1 ไบต์ ไม่ว่าจะเป็นข้อมูลส่วนใดภายในเฟรมจะต้องทำการส่งบิตข้อมูลรวม 11 บิต คือ บิตเริ่มต้น (Start) 1 บิต, บิตข้อมูล 8 บิต, บิตตรวจสอบ Parity ของข้อมูล 1 บิตและบิตหยุด 1 บิต (Stop) 1 บิต หรือหากเลือกแบบไม่มีบิต Parity ก็จะเป็นแบบ Stop แทน 2 บิต สำหรับการกำหนดให้มีบิต Parity นั้น สามารถเลือกเป็นแบบคู่ (Even Parity) หรือคี่ (Odd Parity) ก็ได้ และหากต้องการออกแบบให้สอดคล้องกับอุปกรณ์ที่มีใช้กันทั่วไปมากที่สุด ควรเลือกแบบคู่โดยที่สามารถปรับเปลี่ยนเป็นแบบคี่หรือไม่มีการตรวจสอบ Parity (No Parity) ได้ด้วย
 ลักษณะเฟรมข้อมูลของ MODBUS RTU
 ลักษณะข้อมูลแต่ละไบต์ของ MODBUS RTU
MODBUS ASCII
การรับส่งข้มูลในโหมด ASCII นั้นมีความแตกต่างจากโหมด RTU ตรงที่ในโหมด RTU ข้อมูลที่จะส่งขนาด 1 ไบต์ นำมารวมกับบิตประกอบต่างๆ ก็สามารถส่งออกไปได้เลย แต่สำหรับโหมด ASCII จะมองข้อมูล 1 ไบต์ นั้นออกมาเป็นตัวอักษร 2 ตัว เช่น ค่า 0x5B ซึ่งเป็นเลขฐานสิบหก ก็จะถูกมองเป็นตัวอักษร ‘5’ และตัวอักษร ‘B’ จากนั้นก็จะทำการค้นหารหัส ASCII ของตัวอักษรทั้ง 2 ตัวนั้น ซึ่งได้แก่ 0x35 สำหรับ ‘5’ และ 0x42 สำหรับ ‘B’ แล้วทำการส่งรหัส ASCII ทั้ง 2 ค่านี้ออกไป ซึ่งจะได้ผลเท่ากับการส่งค่า 0x5B ซึ่งเป็นข้อมูลขนาด 1 ไบต์ ในโหมด RTU
จะเห็นได้ว่าการส่งข้อมูลในโหมด ASCII จะต้องทำงานมากกว่าการส่งข้อมูลในโหมด RTU ซึ่งทำให้อัตราเร็วในการสื่อสารมีค่าต่ำกว่า สาเหตุที่เป็นแบบนี้ก็เพราะว่า โหมด ASCII ได้ถูกออกแบบมาสำหรับอุปกรณ์ที่ไม่มีความสามารถในการกำหนดช่วงระยะห่างของ เวลาในการส่งเฟรมข้อมูล อย่างเช่นในโหมด RTU ที่อุปกรณ์สามารถกำหนดได้ว่าจะส่งเฟรมข้อมูลแต่ละเฟรมออกมาด้วยเวลาห่างกัน เท่าใด และอุปกรณ์ที่รอรับข้อมูลก็ต้องสามารถตรวจจับและแยกแยะได้ว่าเฟรมข้อมูลแต่ ละเฟรมที่รับเข้ามานั้นมีระยะเวลาห่างกันภายในช่วงเวลาที่กำหนดหรือไม่ เพื่อทำให้สามารถตรวจสอบหาจุดเริ่มต้นและจุดสิ้นสุดของเฟรมข้อมูลแต่ละเฟรม ได้ แต่ในความเป็นจริงยังมีอุปกรณ์อีกหลายชนิดที่ไม่มีความสามารถพิเศษนี้ จึงต้องใช้วิธีอื่นที่จะช่วยให้สามารถรับรู้จุดเริ่มต้นและจุดสิ้นสุดของ เฟรมข้อมูลได้ นั่นได้แก่โหมด ASCII ซึ่งในโหมดนี้จะเริ่มต้นเฟรมข้อมูลด้วยการส่งรหัส ASCII ที่กำหนดให้หมายถึงจุดเริ่มต้น คือ 0x3A ซึ่งตรงกับตัวอักษร ‘:’ ตามด้วยแอดเดรสของ Slave, หมายเลขฟังก์ชัน, ข้อมูล, รหัสตรวจสอง RLC และรหัส ASCII 2 ตัว ที่กำหนดให้หมายถึงจุดสิ้นสุด คือ รหัส 0x0D และ 0x0A คือรหัส CR (Carriage Return) และ LF (Line Feed) ตามลำดับ โดยในขณะที่บัสข้อมูลว่างจากการรับส่งข้อมูล อุปกรณ์ทุกตัวจะคอยตรวจสอบข้อมูลในบัสว่ามีการส่งรหัส ASCII ของ ‘:’ ออกมาหรือไม่ ถ้ามีก็จะรับรู้ว่าขณะนี้ได้มีการเริ่มต้นส่งเฟรมข้อมูลออกมาแล้ว ก็จะเข้ากระบวนการรับข้อมูลต่อไป
 ลักษณะเฟรมข้อมูลของ MODBUS ASCII
 ลักษณะข้อมูลแต่ละไบต์ของ MODBUS ASCII
MODBUS จะบริการให้อุปกรณ์ติดต่อสื่อสารกันผ่าน Serial Port (RS-232/422/485) แต่ในปัจจุบันได้มีการพัฒนาให้อุปกรณ์สามารถติดต่อสื่อสารกับอุปกรณ์ที่อยู่ บนเครือข่าย Ethernet ซึ่งอุปกรณ์ที่ใช้การสื่อสารแบบ MODBUS Protocol ส่วนใหญ่จะเป็น PLCs, DCSs, HMIs, Instruments อย่างไรก็ตาม MODBUS จำเป็นต้องมีอุปกรณ์จำพวก Gateway และ Bridge ในการติดต่อสื่อสารระหว่าง Serial Line กับ Ethernet
MODBUS TCP/IP
MODBUS TCP/IP ถูกพัฒนาขึ้นโดยมีวัตถุประสงค์เพื่อจะนำการสื่อสารแบบ Internet มาใช้กับอุปกรณ์จำพวก Ethernet Device ระยะในการใช้งานสำหรับการเดินสาย (สาย LAN) คือ 100 เมตร โดยสามารถขยายระยะในการสื่อสารได้โดยการใช้อุปกรณ์ Repeater หรือในระบบ LAN จะเรียกอุปกรณ์นี้ว่า Hub หรือ Switch ก็จะสามารถลากสายได้อีก 100 เมตร และยังสามารถต่อ Repeater ขยายระยะทางได้โดยไม่จำกัด ในการสื่อสารโดยทั่วไปมีความเร็ว 100,000,000 บิตต่อวินาที (100 Mbps) และเชื่อมต่ออุปกรณ์ได้ไม่จำกัดจำนวน

MODBUS TCP/IP
MODBUS ASCII/RTU ที่จะติดต่อสื่อสารกับ MODBUS TCP เพื่อให้ใช้งานในเครือข่าย Ethernet จะใช้ Gateway ติดต่อและแปลงรูปแบบการสื่อสารข้อมูล โดยการสื่อสารของ MODBUS RTU/ASCII จะเป็นการสื่อสารผ่านทาง RS-232/422/485 นั้นจะถูก Gateway แปลงให้เป็น MODBUS TCP เพื่อใช้ในการติดต่อสื่อสารในเครือข่าย Ethernet ต่อไป

การแปลง MODBUS Serial เป็น MODBUS Ethernet

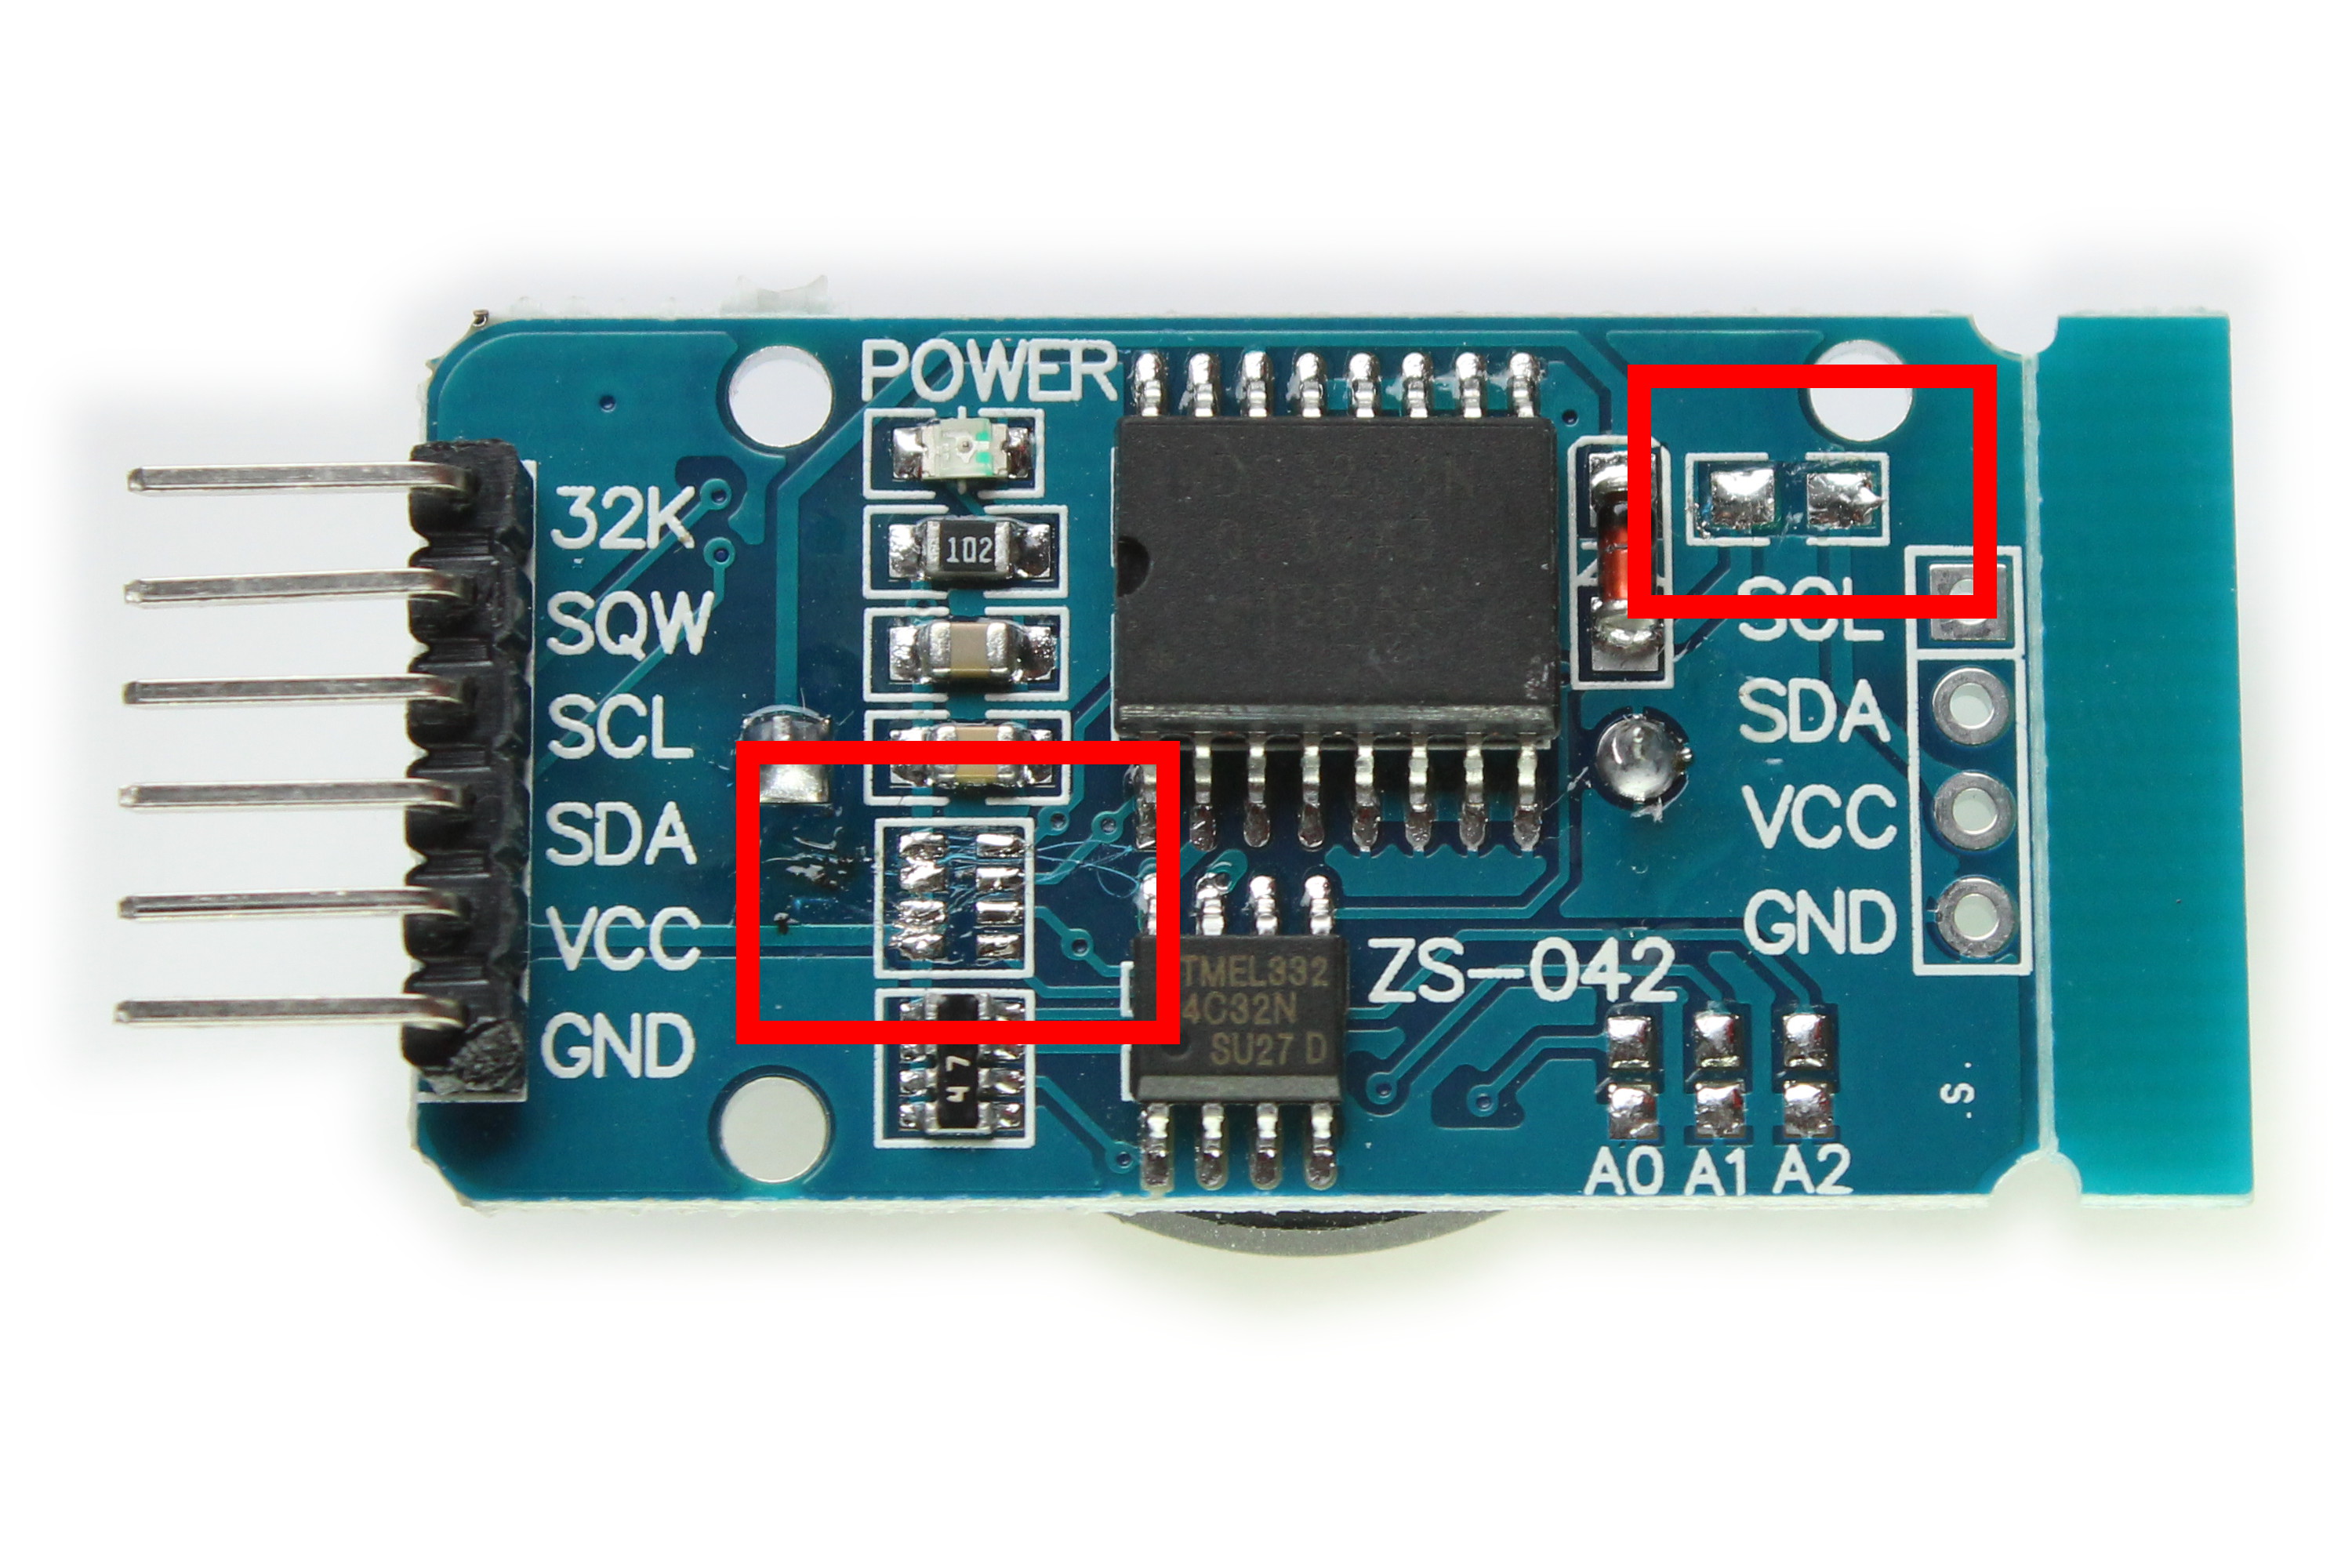
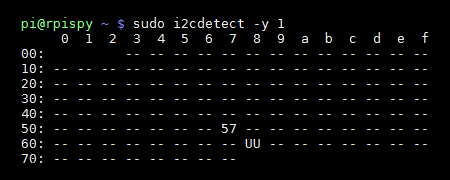
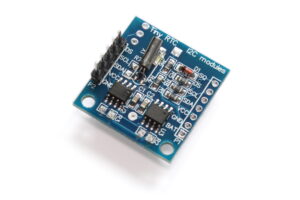 Modules
based on the DS1307 and DS3231 chips are popular devices and you’ll see
them for sale from various retailers. I purchased both types and
quickly realised my DS1307 modules were useless. My advice would be to
go for a DS3231 based module. They are more accurate and run happily
from 3.3V. My two “Tiny RTC” DS1307 modules went straight in the bin.
Modules
based on the DS1307 and DS3231 chips are popular devices and you’ll see
them for sale from various retailers. I purchased both types and
quickly realised my DS1307 modules were useless. My advice would be to
go for a DS3231 based module. They are more accurate and run happily
from 3.3V. My two “Tiny RTC” DS1307 modules went straight in the bin.