วันจันทร์ที่ 25 ธันวาคม พ.ศ. 2560

Installing and adding an external Tomcat server in Netbeans

Installing and adding an external Tomcat server in Netbeans

Netbeans no longer comes with Tomcat bundled so if you want to deploy your application to an Tomcat server you need to manually register an external server.
Note: This article is old no longer and this is not true anymore, Tomcat is now bundled with Netbeans so the steps in this tutorial are not needed anymore. You can download and install the bundle from the official page.

Pre-requisites:

I’m assuming you are using at least Ubuntu Linux 11.10 and you already have installed the the latest Netbeans 7.1 with the Java Web Applications plugin installed.
I also assume that you want to install and configure Tomcat from the repository, if you don’t care an easier method would be to just download apache-tomcat.zip from the Tomcat website, extract the archive to a folder under your home directory and just skip to step 4 of this tutorial where Under Server Location you would browse to where you extracted the archive and under Username and Password you would put the username and password you would have put in tomcat-users.xml.

1. Install Tomcat

1
$ sudo apt-get install tomcat8 tomcat8-common tomcat8-admin tomcat8-user

2. Add an administrative user to Tomcat

Tomcat does have any users defined that could be used for administrative purposes so we need to open tomcat-users.xml in a text editor and add a user with the proper roles assigned to it.
1
$ sudo gedit /etc/tomcat7/tomcat-users.xml
Replace its content with the following and make sure that you replace USERNAME and PASSWORD with the values you want:
1
2
3
4
5
6
<?xml version='1.0' encoding='utf-8'?>
<tomcat-users>
    <role rolename="manager-script"/>
    <role rolename="admin"/>
    <user username="USERNAME" password="PASSWORD" roles="manager-script,admin"/>
</tomcat-users>

3. Some “fixes”

Unfortunately it seams that Netbeans doesn’t correctly detect the the Tomcat installation directory so we need to make some temporary changes till we add the server otherwise will get an error saying “The specified Server Location (Catalina Home) folder is not valid.”
1
2
3
$ cd /usr/share/tomcat8/lib
$ mv catalina.jar catalina.jar.bk
$ wget http://www.razius.com/files/catalina.jar
We need to make sure that the configuration files can be read from the installation directory otherwise will get an error saying “The <CATALINA_HOME>/conf/server.xml can’t be read.”
1
$ sudo ln -s /etc/tomcat7/ /usr/share/tomcat7/conf
We need to chown the Tomcat installation and configuration directory so we don’t have any permission problems. Replace USERNAME with your Ubuntu username:
1
2
$ sudo chown -R USERNAME:USERNAME /etc/tomcat8/
$ sudo chown -R USERNAME:USERNAME /usr/share/tomcat8/
Disable the upstart Tomcat service (Netbeans start’s it up for us automatically):
1
$ sudo update-rc.d tomcat8 disable 0123456

4. Adding the server in Netbeans

Now that you have Tomcat installed and configured we can open up Netbeans and under the Services tab right click on the Servers node and click on Add server.
In the current list select Apache Tomcat and click Next. Under Server Location enter your Tomcat installation directory , by default this should be /usr/share/tomcat7 and under Username and Password put in the username and password that we added in the tomcat-users.xml file.
Click Finish. You should now be able to see Tomcat as an added server under the Servers Node.

5. Revert changes

If we are installing from the repository we need to revert the changes done in step 3:
1
2
3
$ cd /usr/share/tomcat8/lib
$ rm catalina.jar
$ mv catalina.jar.bk catalina.jar

How To Install and Configure Apache Tomcat on a Debian Server

How To Install and Configure Apache Tomcat on a Debian Server

Introduction

Apache Tomcat is an application server that can be used to serve Java applications to web users. It is an open implementation of the Java Servlet and JavaServer Pages specs that were developed by Sun Microsystems.
If you develop Java applications, Tomcat is a quick and easy way to serve them in a full server environment specifically designed for that purpose.
In this guide, we will install Tomcat and do some basic configuration on a Debian 7 VPS. To complete this tutorial, you will have to have a normal user with sudo privileges. Follow this guide to learn how to create users on a Debian system.

Install Apache Tomcat

In this guide, we will install Tomcat version 8 and its associated packages. Luckily, these are included in the default Debian repositories.
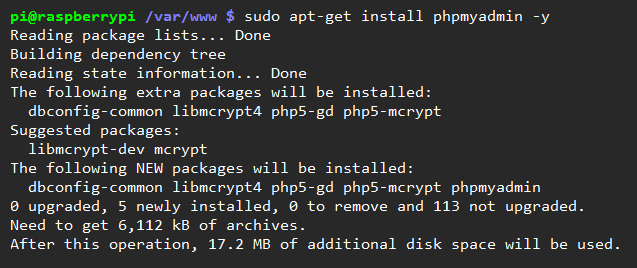
To get the basic package, we can update our package source list and then install the main package:

sudo apt-get update
sudo apt-get install tomcat8
 
This is all we need to do to get to the default Tomcat page. Our installation is not complete yet, but you can take a look at the default Tomcat page by going to your IP address or domain followed by :8080 in your web browser:

your_domain_or_ip:8080 
 

In order to take advantage of more of Tomcat's features, we will install some additional Tomcat packages.
These will allow us to use a web interface to control Tomcat. It will install some documentation and examples that we can also access through the web interface as well.

sudo apt-get install tomcat8-admin tomcat8-examples tomcat8-docs

The Tomcat documentation also suggests that you install Apache Ant, which is a build tool for Java applications, and a version control system of some sort. We will choose git:
sudo apt-get install ant git
These will help you build your Java applications and keep the code organized.

Configure Tomcat Web Interface

Before we can begin using some of the features we installed, we need to configure our server with a user and password. Tomcat does not do this by default for security reasons.
The configuration is very simple. We need to edit a file called tomcat-users.xml. Open it with an editor like this:
sudo nano /etc/tomcat8/tomcat-users.xml
Inside, you will find a heavily commented user configuration file. In fact, the only portions of the file that are not comments are:
<tomcat-users>
</tomcat-users>
As you might expect, we need to define a user between these two lines. We will give this user access to the web interfaces. We can define a user like this:
<tomcat-users>
    <user username="admin" password="password" roles="manager-gui,admin-gui"/>
</tomcat-users>
Choose whatever username and password you would like. This will provide you with login credentials that allow you to access the management panels.
Save and close the file when you are finished.
We should restart Tomcat in order to implement our changes:
sudo service tomcat8 restart
 We should stop Tomcat  to implement our changes:
sudo service tomcat8 stop 

Test the Web Interface

Once you have installed Tomcat and configured the user login, you can access the main page by going to your server IP address or domain name followed by :8080 like this:
your_domain_or_ip:8080
You will see the same default Tomcat page that you saw earlier (if you checked):

ว่าด้วยเรื่อง WebIOPi Raspberry pi model b+


ว่าด้วยเรื่อง WebIOPi Raspberry pi model b+

สวัสดีครับ ท่านผู้ที่ติดตามบล็อกของผมทุกท่าน นะครับหลายเดือนมากซึ่งผมยุ่งมากๆ กับการเปลี่ยนงานใหม่ ไม่มีเวลาที่จะหาความรู้เพิ่มเติม เพื่อนำมาเขียนบล๊อกเลย แต่ผ
มไม่ได้ไปไหนนะครับ ถ้าหากท่านไหนที่กดติดตามเพจของทางเว็บ Facebook : โปรเจคฮาเฮ RPi Python  นั่น เองครับ ซึ่งมีหลายท่านที่ PM เข้าไปสอบถามปัญหาต่างๆ ซึ่งผมเองก็ตอบช่วยได้บ้างไม่ได้บ้างก็ขออภัย มา ณ ที่นี้ด้วยครับ เนื่องจากผมเองก็ไม่ได้มีความรู้มากไปกว่าทุกท่านเลย เอาละครับ พูดพร่ามมายาว เรามาเข้าเรื่องกันเลย

…….หลายวันมานี้ผมได้รับ ข้อความจากทาง Page Facebookที่ขอความช่วยเหลื่อเรื่อง Webio Pi ซึ่งหลายท่านที่เข้ามาอ่านจากบทความของผมแล้วทำตามนั้น ปรากฏว่า ทำตามแล้วสำเร็จ ครับ โดยปัญหาหลักๆ คือในพักหลังๆมานี้ Webio Pi ได้มีการพัฒนาขึ้นจากเดิม (ตอนผมเริ่มเขียนบล๊อกเมื่อ 2557) ไปมากครับ มีการอัพเกรดอุปกรณ์ หลายอย่าง รวมถึงการเพิ่ม pin ของ GPIO ขึ้น มาอีกด้วย ทำให้บทความเรื่องการติดตั้ง WebIO Pi ที่ผมเขียนเอาไว้นั้น(ซึ่งเป็นบอร์ดรุ่น model B ) ไม่สามารถที่จะนำคำสั่งต่างๆ ไปใช้กับเจ้า Model B+ นี้ ได้เลย ถามว่า ติดตั้ง ผ่านไหม ตอบ ว่าผ่านครับ แต่ไม่สามารถทำงานได้เนื่องจาก ซอฟแวร์ที่ ติดตั้งไปนั่นไม่ได้ออกแบบมาเพื่อ Model B+ นี้ ดังนั้นวันนี้ผมถึงมี คำสั่งหยาบ ๆ มาให้ท่านเพื่อใช้เป็นแนวทางในการศึกษา WebIO Pi Model B+ กันครับ


RaspberryPiB+
RaspberryPiB+
……. Rasbperry Pi Model B+ นั้นจะมี GPIO ทั้งหมด 40 pin ด้วยกันนะครับ ซึ่งนับว่าเยอะมากสำหรับการนำมาใช้งานทั่วๆ ไปครับ เพื่อไม่เป็นการเสียเวลาเรามาดูขึ้นตอนการติดตั้งกันเลยครับ
******ผมขอออกตัวไว้ก่อนะครับว่าผมไม่ได้ทดสอบคำสั่งเหล่านี้ด้วยตอนเอง แต่มีหลายท่านที่นำไปใช้ได้ผลนะครับ******
  1. คำสั่ง  cd /home/pi
  2. ทำการ ดาวโหลดแพคเกตซอฟแวร์ ด้วยคำสั่ง sudo wget http://sourceforge.net/projects/webiopi/files/WebIOPi-0.7.1.tar.gz
  3. ทำการแตกไฟล์ ด้วยคำสั่ง sudo tar xvzf WebIOPi-0.7.1.tar.gz
  4. เข้าไปยังโฟล์เดอร์ ด้วยำสัง cd WebIOPi-0.7.1
  5. ทำการดาวน์โหลด แพคเกต patch ด้วยคำสั่ง sudo wget https://raw.githubusercontent.com/doublebind/raspi/master/webiopi-pi2bplus.patch
  6. ทำการ patch แพคเกตด้วยคำสั่ง patch -p1 -i webiopi-pi2bplus.patch
  7. การการติดตั้ง Webio Pi ด้วยคำสั่ง sudo ./setup.sh    
…….จบขั้นตอนการติดตั้ง WebIO Pi แต่ยังไม่สามารถใช้งานได้นะครับ เพราะเราต้อติดตั้ง ซอฟแวร์ที่มีชื่อว่า weaved  เพิ่มเข้าไปจึงจะสามารถทำงานได้ เริ่มกันเลยครับ
  1. ดู Directory ที่อยู่ปัจจุบันของเราก่อนครับด้วยคำสั่ง pwd 
  2. ถ้า Directory อยู่ที่ /home/pi แล้ว ให้ข้ามไปขั้นตอนที่ 3 ได้เลย แต่ยังให้ใช้คำสั่ง cd /home/pi
  3. ทำการดาวน์โหลดแพคเกต weaved จาก Github ด้วยคำสั่ง sudo wget https://github.com/weaved/installer/raw/master/binaries/weaved-nixinstaller_1.2.13.bin
  4. ทำการแก้ไขสิทธิ์ ของ weaved ด้วยคำสั่ง sudo chmod +x weaved-nixinstaller_1.2.13.bin
  5. ทำการติดตั้ง weaved ด้วยคำสั่ง sudo ./weaved-nixinstaller_1.2.13.bin 
  6. ทำการ Start Weaved ด้วยคำสั่ง sudo /usr/bin/Weavedwebiopi8000.sh start
  7. ทำการ Start WebIO Pi ด้วยคำสั่ง sudo /etc/init.d/webiopi start
  8. ทดสอบการทำงานด้วยการเข้าไปที่ http://youip:8000/app/gpio-header หรือ http://youip:8000/ 
…….หน้าตาที่ได้จะประมาณนี้ครับ

12208067_10205413914363685_1275479253_n
WebioPi + Weaved
ที่มา:https://www.informalsoft.com/%E0%B8%A7%E0%B9%88%E0%B8%B2%E0%B8%94%E0%B9%89%E0%B8%A7%E0%B8%A2%E0%B9%80%E0%B8%A3%E0%B8%B7%E0%B9%88%E0%B8%AD%E0%B8%87-webiopi-raspberry-pi-model-b/

Raspberry Pi ขั้นตอนการติดตั้ง Apache, PHP, MySQL


      Raspberry Pi เองเป็นคอมพิวเตอร์ขนาดเล็กที่รัน Linux อยู่ภายใน และสามารถใช้งาน Server เพื่อทำงานเป็น WEB Base Sever ที่สามารถใช้งาน PHP กับ MySQL ดังนั้นเราจะมาทำการติดตั้ง Apache, PHP, MySQL บน Raspberry Pi กันดูบ้าง

@ ต้องทำการ update มาก่อนเสมอ (ถ้าเคยทำแล้วก็ข้ามขั้นตอนนี้ไป)
sudo apt-get update

@ ติดตั้ง apache2 เป็น Server
sudo apt-get install apache2
(เมื่อใช้ Browser เปิดเข้า 192.168.xxx.xxx ของ Raspberry จะขึ้น It works! )

@ ติดตั้ง mysql ใช้งานฐานข้อมูลใน Server
sudo apt-get install mysql-server
(mysql-server จะให้ตั้งรหัสผ่านใหม่ ของ user : root)

@ ติดตั้ง php5 ใช้งานใน Server
sudo apt-get install php5

@ ติดตั้ง phpmyadmin ใช้งานฐานข้อมูลใน Server
sudo apt-get install phpmyadmin
(phpmyadmin จะให้ตั้งรหัสผ่านใหม่ ตั้ง user : root เหมือน mysql-server)

@ คัดลอกโฟลเดอร์ phpmyadmin ไปไว้ที่ www เพื่อใช้งาน
sudo ln -s /usr/share/phpmyadmin /var/www/phpmyadmin

@ รีสตาร์ท Apache2
sudo service apache2 restart

@ รีสตาร์ท mysql
sudo service mysql restart

@ ทำการคอนฟิกและเพิ่มความปลอดภัยให้ MySQL
sudo mysql_secure_installation


@ เริ่มด้วยการอัพเดทแพคเกจ
sudo apt-get update

แค่อัพเดตก็พอ ไม่ต้องอัพเกรดนะครับ เพราะเราไม่ต้องการใช้ Linux รุ่นใหม่


@ ติดตั้ง apache2 เป็น Server
sudo apt-get install apache2


@ ติดตั้ง mysql ใช้งานฐานข้อมูลใน Server
sudo apt-get install mysql-server


@ ติดตั้ง php5 ใช้งานใน Server
sudo apt-get install php5


@ ติดตั้ง phpmyadmin ใช้งานฐานข้อมูลใน Server
sudo apt-get install phpmyadmin

• ระหว่างการติดตั้งจะมีการกำหนดรหัสผ่านด้วย โดยให้กำหนดรหัสผ่านสำหรับ MySQL


ติดตั้ง PHPMyAdmin

       • ถ้าต้องการติดตั้ง PHPMyAdmin เพื่อเข้าไปจัดการฐานข้อมูลก็ให้ใช้คำสั่ง sudo apt-get install phpmyadmin -y


       • ระหว่างการติดตั้งจะมีให้กำหนดว่าใช้ Web Server แบบใดอยู่ ให้เลือกเป็น Apache2 แล้วเลือกที่ OK (ใช้ Space Bar เพื่อเลือก และใช้ Tab เพื่อสลับ Cursor ไปมาระหว่างปุ่ม OK)


        • จะมีการตั้งค่าฐานข้อมูล ให้เลือก Yes


       • กำหนดรหัสผ่านสำหรับ Administrator ของฐานข้อมูล


       • กำหนดรหัสผ่านสำหรับฐานข้อมูล


       • เมื่อติดตั้งเสร็จแล้วให้ลองเปิด Web Browser ไปที่ PHPMyAdmin เช่น 192.168.1.37/phpmyadmin หรือ http://localhost/phpmyadmin ถ้าเปิด Web Browser บน Raspberry Pi ก็จะพบกับหน้า Login ของ PHPMyAdmin

       สำหรับ Username ให้ใช้ว่า root และ Password ให้ใช้ตามที่กำหนดไว้ตอนติดตั้ง PHPMyAdmin

       • จะสามารถเข้ามาใช้งาน PHPMyAdmin ได้แล้ว


       เพียงเท่านี้ Raspberry Pi ก็พร้อมจะพัฒนาต่อให้เป็น Web Server ตามใจคุณแล้ว!

@ คัดลอกโฟลเดอร์ phpmyadmin ไปไว้ที่ www เพื่อใช้งาน
sudo ln -s /usr/share/phpmyadmin /var/www/phpmyadmin


@ รีสตาร์ท Apache2
sudo service apache2 restart

@ รีสตาร์ท mysql
sudo service mysql restart

เปิด Web Browser เข้าสู่โดเมนเนมของ Raspi โดยป้อน 192.168.xxx.xxx (ตาม IP ของ Raspberry Pi)


@ ทำการคอนฟิกและเพิ่มความปลอดภัยให้ MySQL
sudo mysql_secure_installation


ใส่รหัสใหม่ ของ root (ห้ามว่างไว้)


ที่เหลือก็ตอบ Yes ให้หมด


เปิด Web Browser เข้าสู่โดเมนเนมของ Raspi
โดยป้อน 192.168.xxx.xxx/phpmyadmin  (ตาม IP ของ Raspberry Pi)


@ ใช้คำสั่ง ให้สามารถ Read, Write, Create ได้
sudo chmod 777 /var/www/ 

ที่มา:http://dtv.mcot.net/data/up_show.php?id=1453811721&web=epost